Documentation
Quick Navigation
AutoQ reference
- How AutoQ picks — what each of the eight picking stages decides, what it can throw out, and what it writes down.
- Reading an AutoQ pick — what a pick records at each stage, where to find it, and what a wrong one looks like.
Getting Started
MBXHub is a MusicBee plugin that exposes the MusicBee API over HTTP. Once installed, you can control MusicBee from any device on your local network.
Installation
Requirements
- Windows 10 or later
- MusicBee 3.5 or later
- .NET Framework 4.8 (the plugin — included with Windows 10+)
- .NET 8.0 Desktop Runtime (the
MBXHub.execompanion — media keys, first-run network setup, Overlay)
Steps
- Get MusicBee if you haven't already
- Download the latest release ZIP file
- Extract the ZIP —
mb_MBXHub.dll(the plugin),MBXHub.exe(the companion) andmbxutil.exe(maintenance tool) - Copy all files to:
%APPDATA%\MusicBee\Plugins\(typicallyC:\Users\YourName\AppData\Roaming\MusicBee\Plugins, or thePluginsfolder next to MusicBee.exe for portable installs) - Restart MusicBee — the companion starts with it and, on first run, opens the network setup screen: click Enable network access, then scan the QR code from your phone. You can reopen it any time from the tray icon (Network setup) or Tools → MBXHub → Settings → Firewall
- Optionally, configure MusicBee hotkeys for ARiA navigation presets
- Optionally, download Truedat for mood scanning (AutoQ) — see Scanning and the Truedat repository
Verifying Installation
Open the dashboard in your browser (the port is shown on the network-setup screen and in the companion's startup toast; 8080 unless taken):
http://localhost:8080Configuration
Nearly everything is configurable, and you should not need to edit a file to do it. There are three places to change settings, and they all write to the same config — pick whichever is in front of you.
Settings page (browser)
The fullest surface, and the one to reach for by default. Every setting the plugin exposes is here, grouped by category with its description, range and default:
http://localhost:8080/pages/settings.htmlIt is linked from the dashboard as Settings, and it works from your phone as well as the machine running MusicBee.
Inside MusicBee
Tools → MBXHub → Settings opens the plugin's own dialog. It carries the settings that have to stay reachable when the network is not — ports, firewall and access control — which is exactly why they are not on the web page. The first-run network setup screen lives here too, and on the companion's tray icon.
Full settings reference
MBXHub serves its own configuration reference, so it always describes the build you actually have rather than whatever a website said at release time:
http://localhost:8080/pages/config.htmlConfig files
You are welcome to edit these directly, but the settings page is easier and validates what you type. Two processes, two files:
| File | Location | What it holds |
|---|---|---|
mbxhub.json |
%APPDATA%\MusicBee\MBXHub\ |
The plugin: REST/WebSocket, library, AutoQ, PartyMode, ARiA, themes |
mbxhub-shell.json |
%LOCALAPPDATA%\MBXHub\ |
The companion: SMTC target, tray, overlay/HUD |
The companion's tray menu has Settings → Open Settings Folder…, which opens the folder its config is actually loaded from — worth using rather than typing a path, especially if MusicBee and the companion are on different machines.
Changing settings from a script
For automation. Send only the keys you want to change; anything you omit is left alone. Keys are the dotted, camelCase paths shown on the settings page:
PUT http://localhost:8080/system/settings
Content-Type: application/json

{
  "debugMode": true,
  "autoQ.enabled": true
}
Three things will refuse you, all deliberately: a few settings (the REST port among
them) only change from localhost; remote changes are rejected outright
while PartyMode is running; and disableRemoteConfig turns the whole
endpoint local-only. Each answers 403 saying which applied.
See the API reference for the full endpoint list.
PartyMode Setup
PartyMode lets guests browse your library and request songs at a party. Three roles: Guest (browse/request), DJ (full control), Display (TV mode).
Quick Start
- Open
http://localhost:8080/pages/partymode/in a browser - Enter a PIN (e.g., 1234) and click "Start Party"
- Open the Display page on a TV:
/pages/partymode/display.html - Guests scan the QR code on the display, enter the PIN and their name
- Guests can now browse and request songs
Pages
| Page | URL | Purpose |
|---|---|---|
| Join | /pages/partymode/ |
PIN + nickname entry |
| Guest | /pages/partymode/guest.html |
Browse and request songs |
| DJ | /pages/partymode/dj.html |
Full queue control, see requests |
| Display | /pages/partymode/display.html |
TV mode with artwork, lyrics, QR code |
Tips
- Use separate PINs for guests and DJ for more control
- The Display page auto-refreshes the QR code every 30 seconds
- Guest vibes (thumbs up/down) influence the shuffle when MBXQ is enabled
- The request feed shows both joins and song requests
ARiA Setup
ARiA (Arbitrary Remote Initiated Actions) enables remote keyboard/mouse control and automation.
How It Works
ARiA actions are defined in the plugin configuration file (mbxhub.json). Each action specifies a script command (like sending keystrokes) that can be triggered remotely. Once ARiA is enabled, you can execute these actions from the REST interface or the dashboard.
The default presets are already configured to send tab navigation hotkeys (Ctrl+Alt+A through L). All you need to do is set up the matching hotkeys in MusicBee and enable ARiA.
Step 1: Open MusicBee Preferences > Hotkeys
- Open MusicBee on your jukebox/media center PC
- Go to Edit > Preferences
- Select Hotkeys from the left panel
Step 2: Configure Tab Navigation Hotkeys
Find the "General: Goto Tab X" actions and assign hotkeys. The screenshot below shows the preconfigured keys:
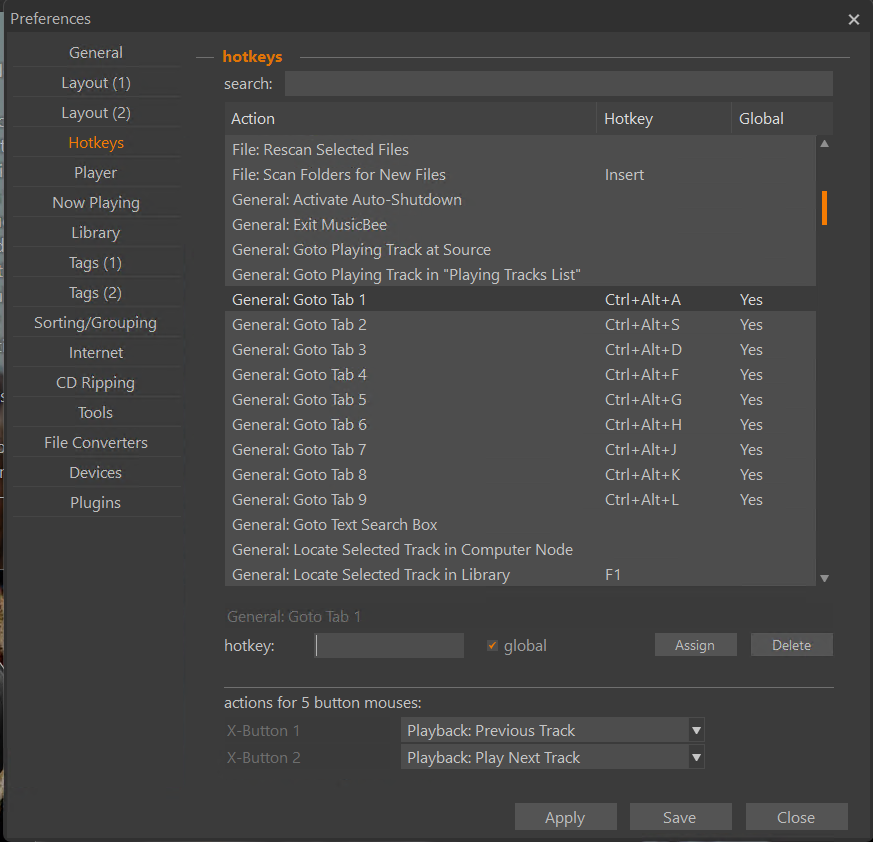
Example configuration using home-row keys:
| MusicBee Action | Hotkey | Global |
|---|---|---|
| General: Goto Tab 1 | Ctrl+Alt+A | Yes |
| General: Goto Tab 2 | Ctrl+Alt+S | Yes |
| General: Goto Tab 3 | Ctrl+Alt+D | Yes |
| General: Goto Tab 4 | Ctrl+Alt+F | Yes |
| General: Goto Tab 5 | Ctrl+Alt+G | Yes |
| General: Goto Tab 6 | Ctrl+Alt+H | Yes |
| General: Goto Tab 7 | Ctrl+Alt+J | Yes |
| General: Goto Tab 8 | Ctrl+Alt+K | Yes |
| General: Goto Tab 9 | Ctrl+Alt+L | Yes |
| Player: Toggle Visualiser | Ctrl+Alt+Shift+V | Yes |
| Player: Visualiser Fullscreen | F11 | Yes |
Tip: Check the "global" checkbox so the hotkeys work even when MusicBee isn't the focused window. This uses the home-row keys (A, S, D, F, G, H, J, K, L) for easy reach.
Step 3: Enable ARiA in Plugin Settings
- Still in Preferences, go to Plugins
- Find MBXHub and click "Configure"
- Check "Enable ARiA (Arbitrary Remote Initiated Actions)"
- Click Save to apply all changes
Remember: You can configure any MusicBee hotkey and send it remotely via ARiA - not just tab switching. Play/pause, volume, shuffle, visualizers - anything with a hotkey can be triggered remotely.
Beyond hotkeys: automation preset examples
ARiA scripts aren't limited to keystrokes. Presets are defined under ariaPresets in mbxhub.json (in your MBXHub AppData folder), and the run(…) command can launch a whitelisted external program — so a single dashboard button can scan your library or sync files. Add these keys to your existing mbxhub.json (merge them in — don't replace the whole file), then Save. The presets show up as buttons on the dashboard's ARiA charm.
Example — Scan library (keystrokes only)
Pure keystrokes, so it only needs an ariaPresets entry — no program whitelist. It presses MusicBee's scan folders for new files hotkey (Insert), waits for the dialog, then confirms with Alt+Enter:
{
  "ariaPresets": [
    {
      "name": "scan-library",
      "script": "sendkeys({INSERT}); delay(3000); sendkeys(!{ENTER})"
    }
  ]
}
sendkeys({INSERT}) triggers the scan, delay(3000) waits 3 seconds for MusicBee's dialog, and sendkeys(!{ENTER}) sends Alt+Enter to confirm. Adjust the keys/delay to match your own MusicBee hotkeys.
Example — Sync from a server (pull) & copy to a server (push)
Launching an external program (here robocopy) is a two-part setup: first whitelist the program under ariaAllowedPrograms (name + full path + arguments), then reference it by name from a preset with run(<name>). The whitelist is the security boundary — ARiA only launches programs you've explicitly listed.
{
  "ariaAllowedPrograms": [
    {
      "name": "music-pull",
      "path": "C:\\Windows\\System32\\Robocopy.exe",
      "args": "\\\\YOUR-SERVER\\Music D:\\Music /MIR /R:2 /W:5 /LOG:D:\\music-pull.log",
      "hidden": true
    },
    {
      "name": "music-push",
      "path": "C:\\Windows\\System32\\Robocopy.exe",
      "args": "D:\\Music \\\\YOUR-SERVER\\Music /E /R:2 /W:5 /LOG:D:\\music-push.log",
      "hidden": true
    }
  ],
  "ariaPresets": [
    {
      "name": "pull-from-server",
      "script": "run(music-pull)",
      "icon": "↓"
    },
    {
      "name": "push-to-server",
      "script": "run(music-push)",
      "icon": "↑"
    }
  ]
}
Sync from (pull) mirrors \\YOUR-SERVER\Music → D:\Music — robocopy's /MIR makes the local copy an exact mirror of the server, deleting local files that aren't on the server, so double-check which side is which before running. Copy to (push) goes the other way, D:\Music → \\YOUR-SERVER\Music, using /E so it's additive: new and changed files are copied up, and nothing on the server is ever deleted. hidden: true runs it with no console window, and /LOG: writes a report of what changed. Replace YOUR-SERVER and the paths with your own; the icon (↓ / ↑ here) is what the dashboard button shows.
ARiA Documentation
For complete ARiA documentation including all commands, DuckyScript syntax, presets, and examples, see the ARiA section in the API docs or access /aria directly on your MBXHub instance.
Usage
Basic Usage
Control playback with simple HTTP requests:
# Play/Pause
curl -X POST http://localhost:8080/player/playpause

# Get current track
curl http://localhost:8080/nowplaying

# Set volume to 50%
curl -X PUT http://localhost:8080/player/volume \
  -H "Content-Type: application/json" \
  -d '{"volume": 0.5}'
Advanced Usage
For complete API access, use the RPC endpoint:
# Call any MusicBee API method
curl -X POST http://localhost:8080/rpc/Library_QueryFilesEx \
  -H "Content-Type: application/json" \
  -d '{"query": "[Artist]=Beatles"}'
See the API documentation for all available endpoints.
Troubleshooting
Common Issues
Issue: Cannot connect to localhost:8080
Solution: Check that MusicBee is running and the plugin is loaded. Look in MusicBee's plugin settings to verify MBXHub is enabled. Then open MusicBee → MBXHub Settings → Network Status (v0.5.5.0) — it checks every firewall rule and reservation MBXHub needs, for both processes, and anything missing gets a one-click elevated Fix. MBXHub also checks this itself at startup and prompts if the setup is partial or broken.
Issue: CORS errors in browser
Solution: MBXHub restricts CORS to localhost and local network IPs (192.168.x.x, 10.x.x.x, 172.16-31.x.x). Ensure your request originates from an allowed IP range.
Issue: Port already in use
Solution: Change the REST port in settings to an available port (e.g., 8081).
Issue: Can't find the Plugins folder (Windows Store version)
Solution: The Windows Store version of MusicBee uses a sandboxed location that's difficult to access. Use the portable version instead for easier plugin installation.
Issue: Pages not updating after upgrade
How page serving works:
- Check if file exists on disk → serve from disk
- If not found on disk → serve from embedded resources
- If not found in either → 404
Disk files take priority (for customization), embedded resources as fallback (for updates/defaults).
Solution: Delete specific files from %APPDATA%\MusicBee\MBXHub\pages\ and refresh your browser. The embedded version will be served automatically - no restart needed.
Note: Back up any customizations before deleting.
Getting Help
If you need additional help:
- Check the API documentation for endpoint details
- Check the features page for capabilities
- Visit the GitHub repository for issues and discussions